The KimiTech Industries Modders Guide
This is a guide for those wishing to create a mod for Cave
Story (AKA Doukutsu Monogatari). This document won't cover everything,
and should be used along side other resources and guides - this is
merely the bare-bones for getting into the most basic of modding. That
said, using just the subjects covered in this document, one would be
able to make a new, if incredibly basic, mod. ;)
Jump To:
What You'll Need:
Programs and tools that are essential to creating a mod.
- Cave Story - A copy is included in the CS Tools Rar ;)
- Cave Editor - Your primary tool. Included in the CS Tools Rar.
- MS Paint or similar - Any graphic editing program will do, really. The editor built into CE is decent, but it limits the colors you can use to the selected colors in the original image if I recall correctly.
- A hex editor (Optional) - Only *really* needed if you don't take out the "(C)Pixel" requirement.
- IrfanView (Optional) - A free multi-image preview tool with some hand options like color swapping. Useful for batch conversions and tweaking image colors.
Before You Begin:
Things to keep in mind while getting started and working through to completion.
- Save often! You'd be surprised how many hours of work you can lose daily to forgetting to save.
- Back up often! Even if what you have is a garbled mess of corruption, back it up.
- Test often! And be diligent. If you're going to release a demo, make sure you put an extra day for testing. And don't forget to run it through the stupid test!
- Make notes! Lots of modders start out ambitious but taper off as each little snag gets them down. Make notes on what works, what doesn't, where you're going and what you've done.
- Bugs happen! There are countless ways to make something not work, but be sure to check the obvious. If you're really stuck, ask for help.
- Have fun! Try to keep light-hearted about the whole process. And remember, even if you feel pressure to release it, it doesn't mean you have to. Most people would rather see a polished work a month late than a sloppy wad of trash a month early.
The Basics: TSC
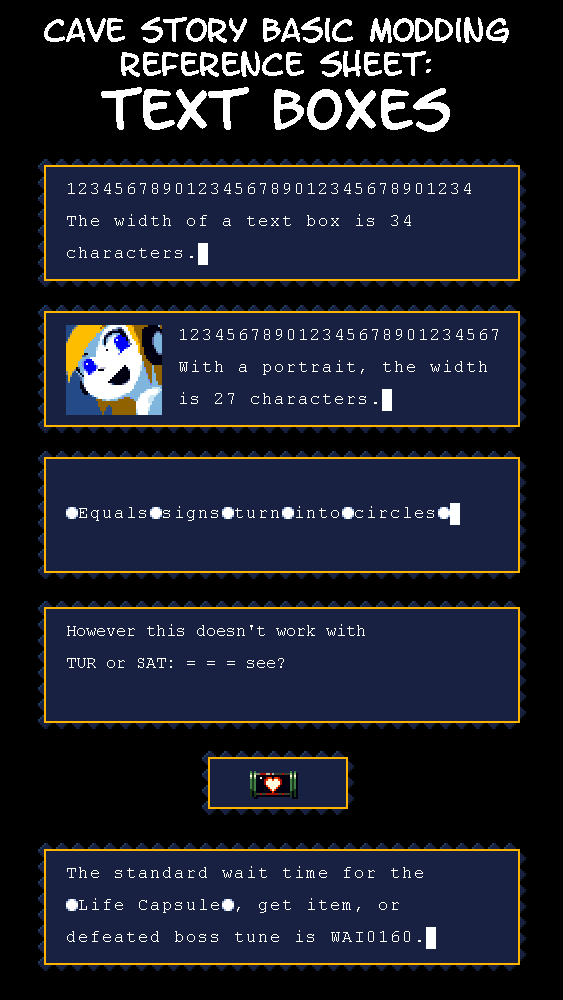
First things first, I'm going to give you the BASICS. TSC is a custom language in many ways unique and undocumented (officially, anyway). And in many ways VERY accessible. The most important points when working with TSC (and the source of most bugs):- There are 3 reserved characters: < (Less-than sign, AKA Shift+,) is a reserved character. There is no way to make one appear in game text, as the game interprets anything following a < as the start of a TSC command. = (Equals sign) will turn into a graphic bullet mid-text, with the exception of a couple commands that override this. # (numeral sign) is used to declare a new TSC event. Can be included in text *theoretically*, but will cause bugs unless carefully done.
- ALL TSC VALUES ARE 4 DIGITS LONG! No exceptions. If a command calls for a numerical value, it must be 4 digits long (eg. 1006, 0003, 0101)
- ALL TSC commands MUST BE CAPITALIZED! <Sou is different from <SOU - <Sou will give you an error.
- Some commands call for multiple variables, these can be separated by any non-<, non-= character. For consistency sake I suggest using a colon (":"). An example of a proper format would be <CAT0001:0301
- Individual TSC commands don't need to be closed. Some commands will require other commands to make work properly (for example, the command that opens a text box should at some point be followed by the command that closes the text box.)
- TSC "events" do need to be ended, and that's what the <END command is for. An event is a series of commands assigned to a particular 4-digit value. (See example below)
- Spaces and carriage returns (enter key character) will appear in-text as-is, except if included inside a commands' series of variables (which can cause bugs, so don't do it).
- While the game is processing an event, the PC cannot take damage except from certain entities (namely the moving blocks that crush you). Keep this in mind if adding events to areas with enemies.
An Example TSC Event
#0100
<KEY<MSG Hello world, this is my text box!<NOD<CLR
This is the second section!<NOD<CLR
I'm going to close it now.<NOD<CLO<SOU0011<END
Here's what it looks like:
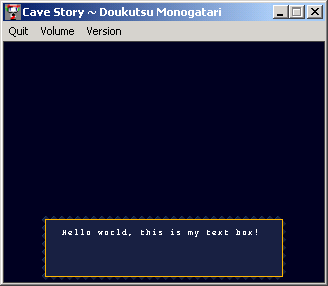
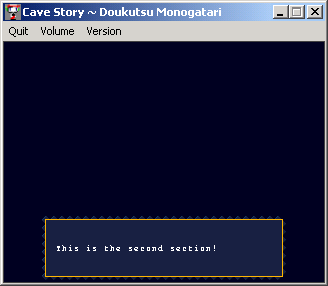
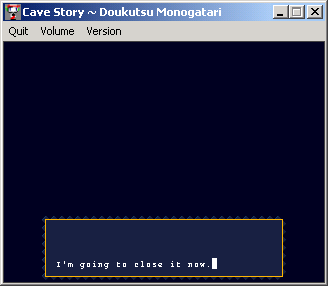
The result of this is, when event 0100 is called, the player input is locked out (so the PC doesn't bounce around), and then a text-box is opened. In the first line of the text box, the text "Hello world, this is my text box!" is displayed. The game then waits for the player to press jump/shoot to advance to the next part. After player input is received, the previous text is erased and the text "This is the second section!" is displayed (this time in the second line of the text-box). Once more the game waits for player input and clears the text-box on receiving it before displaying the last line (in the third and final line of the text box), "I'm going to close it now.". It then waits for player input before closing the text-box and playing a sound. Finally, the entire event #0100 is ended.
To get a feel for whitespacing and stuff, try goofing around with that script snippet in Cave Editor.
A Note on Head.tsc
Head.tsc is the global script sheet. You can place events here that you will call frequently (such as beds, save points and the death events). Of important note here:
- When calling an event, the game checks head.tsc first, then the script for the current map. This is important because an event on-map can't have a #XXXX lower than the highest #XXXX in head.tsc
- Everything in here can be edited, but events #0040 and #0041 are reserved for the death (lethal damage) and drowning scripts respectively. Event #0042 is the event for falling off the screen and can be changed to anything (just remember what you change it to!).
- The bit of gibberish with the word "almond" at the bottom informs the game that if a certain flag (flag 4000) is set when you drown on a certain map. This is used for the post-Core sequence. The format of this is being dissected and will be added here when it is fully understood.
Adding Comments
Comments may be added directly following an <END. As in:
I'm going to close it now.<NOD<CLO<SOU0011<END //This line is a comment.
Add comments to denote what does what when writing complex scripts. It can really help sort out rats nests.
Calling Events
There are a few ways to call events. The four most common are:
- Calling an event when loading a map. The TSC command <TRAWWWW:XXXX:YYYY:ZZZZ takes an argument for the script to run on the destination map. See Inter-Map Travel
- Calling an event on interaction (pressing down). Setting flag 2000 (see Entities) on an entity will do three things: make it non-hostile, non-shootable (see the Gaudi in the Labyrinth shop), and make it run an event when interacted with.
- Calling an event with a H/V trigger. H/V triggers are amazing things and of special note (they are entity 0046). The way they work is that (depending on what flags are set - See H/V Trigger ) they call an event when they are crossed horizontally or vertically.
- Calling an event when an entity dies. Setting flag 0200 (see Entities) on an entity will cause it to run an event when it dies.
This is important because an event that isn't run is useless, and therefore a waste.
Key TSC Commands
These are commands that everyone who's anyone should know by heart. They are the core commands used by nearly every mod (see tsc.xls for more details on these and other commands). With these 13 commands you should be able to do 80% of what you need to.
|
Command
|
Does
|
Variables (In order)
|
Notes
|
| <KEY | Locks out player controls until end | None | Should be used at the start of cutscenes that require animations. |
| <PRI | Same as< KEY, but also freezes game action. | None | Useful for mid-action dialogue and things like chests and life capsules. Prevents enemies from swarming the PC. |
| <TRA | Changes the map | Destination map #, Script to run on arrival, X coords, Y coords | Changes maps, then runs a script from the destination map. PC is placed at X:Y. |
| <MSG | Opens a normal text-box. | Text to output | Default text-box style. |
| <MS2 | Opens an invisible text-box at top of screen. | Text to output | Invisible text box; good for PC thoughts, or the words of ghosts and stuff. |
| <MS3 | Opens default text-box at top of screen. | Text to output | Useful for cutscenes with a low floor (doesn't cover the action). |
| <NOD | Pauses the event until player input. | None | Good for anything where player should control speed (text, some animations etc.) |
| <CLR | Clears the current text-box. | None | Self explanatory. |
| <CLO | Closes the current text-box. | None | Self explanatory. |
| <END | Ends the current event. | None | Every event should have this at the end. |
| <FAO | Fades out the screen. Effect can be edited. | Direction Code (See Directions) | Often used with <TRA to give the illusion of time elapsed. |
| <FAI | Fades in the screen. | Direction Code | Should follow a <FAO at some point. |
| <WAI | Waits for a duration. | Any value from 0000 to 9999 | Waiting for 0000 would be pretty useless. Time is measured in ticks. |
The Basics: Music and Sounds
To add background music, use the <CMU command in the format: <CMUXXXX, where X is the number of the song you wish to play. Additionally, all songs except event tracks can be resumed playing with the <RMU command. This is handy for events like getting an item where you have a song playing, switch to the Get Item music and then want to go back to the previous song. The 4 event tracks are as follows:
0003 - Game Over
0010 - Get Item
0015 - Boss Defeated
0016 - Get Life Capsule
Unlike normal songs they do not automatically loop back to the start. In order to not cut out the entire song, add a <WAI for 0160 before switching back to the original track. The names given are just what they're used for in original Cave Story, not what they have to be used for. Additionally, the <FMU command will reduce the current music to about 1/3 of its volume. Handy for areas with sound effects or for changing tracks without jarring.
To play a sound effect, use the <SOU command. Sound effects are short noises that often accompany in-game action. The <SOU command is best reserved for cutscenes and areas with no enemies, though its quick execution doesn't prohibit its use in enemy-rich environments. Some handy values for this are:
0011 - Door opening
0022 - Chest opening/door unlocking
0044 - Explosion
0070 - Getting slapped
The Basics: TSC-Based Flags
A flag is a special piece of data that informs the game that something has been done (such as defeating a boss). There are 4 types of TSC-based flags in Cave Story: Hard flags, skip flags, map flags and equip flags. The most commonly used are hard flags (so-called because they are saved to Profile.dat when the game is saved).
Hard Flags
There are 3 commands associated with hard flags: <FL+. <FL-. and <FLJ
<FL+ sets a flag. Valid values are between 0001 and 9999. However, due to a limitation, only flags up to 7000 are saved to Profile.dat - Keep this in mind when writing a complex series of flags. As well, an unknown number of flags are reserved, so generally start with flags at 0100 to be safe and not muck up the game.
<FL- clears a flag. Again, values from 0001 to 9999 are valid. Clearing a flag that hasn't been set doesn't do anything.
<FLJ is the meat of the operation. It takes 2 arguments, the first being the flag it checks, and the second being the event to go to if the flag is set. Functions very similar to an IF statement. To bring this all together:
#0100
<KEY<FLJ0100:0101<MSG Flag set.<FL+0100<NOD<CLO<END
#0101
<KEY<MSG Flag unset.<FL-0100<NOD<CLO<END
What this example will do is, upon calling event #0100, check to see if flag 0100 is set. If it is, it jumps to event #0101 and runs it, which clears the flag. If the flag ISN'T set, it continues event #0100 on to set the flag (which will trigger the jump next time it is run).
Don't be afraid to use flags, but be sure to make notes as to what flag is used for what. Lastly, hard flags are the only flags entities with flags 800 or 4000 set respond to.
Skip Flags
Skip flags function EXACTLY the same as hard flags, with the exception that they are not saved to Profile.dat EVER. The 3 commands used are: <SK+, <SK-, and <SKJ. These commands have identical syntax to the hard flag commands. Skip flags are used for just that - to skip an event. Generally used in long-winded dialogues before boss fights to allow the dialogue to be skipped or sped up. Generally, no notes are needed for skip flags as their temporary nature allows you to get away with duplicate instances.
Map Flags
Map flags are a type of flag discovered by yours truly. Their use is limited, however, to essentially marking areas the PC has visited. There are 2 commands associated with map flags: <MP+ and <MPJ. Note the lack of a command to unset these flags. These are permanent and saved, so keep that in mind. Other than the lack of unsetting ability, they function the same as hard or skip flags with the exception that you are limited to one map flag per map, and that the jump command (<MPJ) assumes it's looking for the flag for the current map (so the format is <MPJXXXX, where X is the event to run if the flag is set). Map flags can be set from anywhere for any level (eg. You can set the map flag for map 0043 from an event in map 0001). For example:
#0100
<KEY<MPJ0100<MSGArea
discovered!<MP+0001<NOD<CLO<END
#0101
<KEY<MSGYou've been here before...<NOD<CLO<END
As a general rule, map flags are limited in their usefulness except for, say, a mapping system that only allows you to view the map if you reach a certain point.
Equip Flags
Equip flags aren't totally in line with the other flag types listed, but are included here for organization. These flags only have 2 commands associated with them: <EQ+ and <EQ- - There is no jump for these flags. To achieve a jump-if-equipped, use a hard flag in addition to setting the equip flag. You can use the hard flag for the actual jump, then. But what equip flags do provide, as their name suggests, are equipable items. The following are the ONLY valid values - Any others will do nothing.
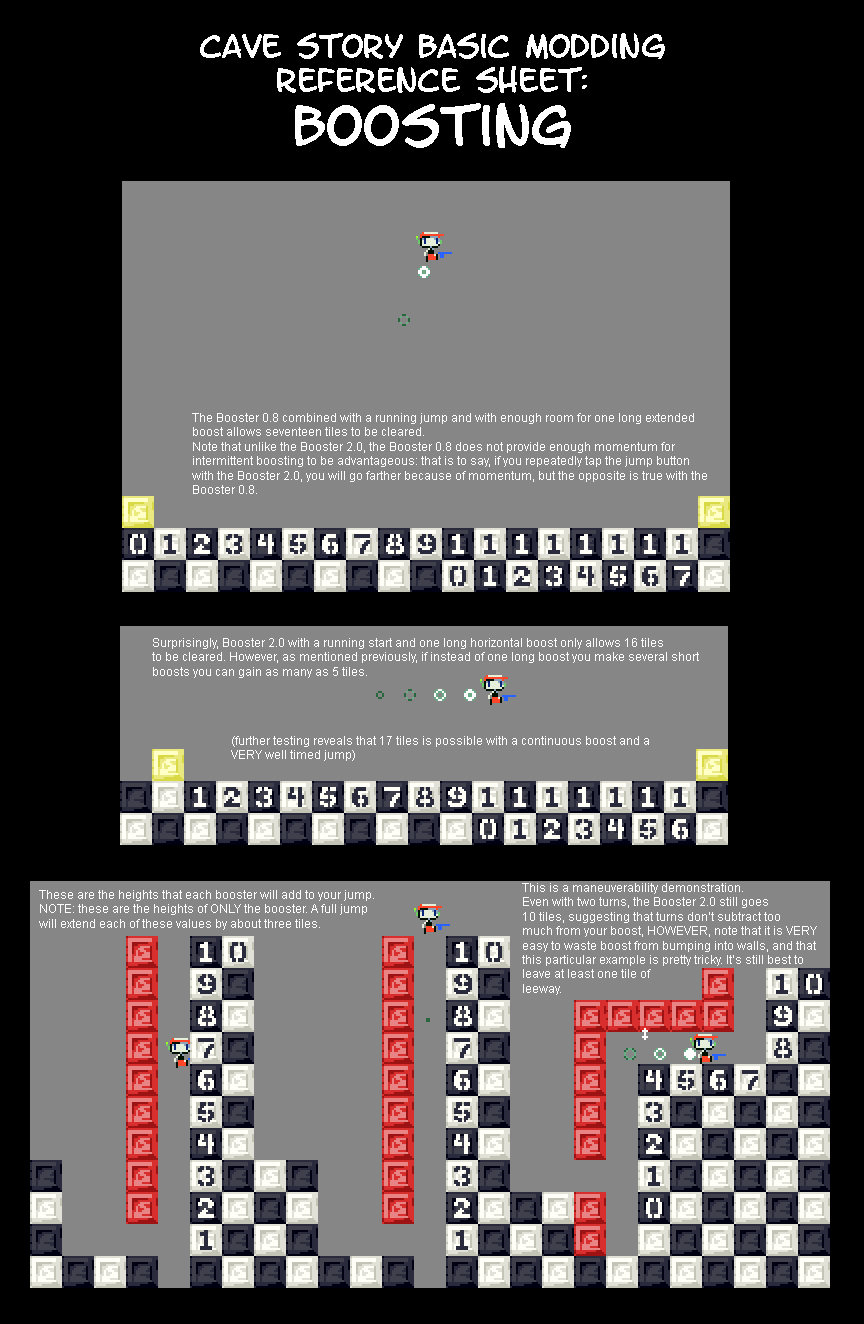
0001 - Booster v0.8
0002 - Map System
0004 - Arms Barrier
0008 - Turbocharge
0016 - Curly's Air Tank
0032 - Booster v2.0
0064 - Mimiga Mask
0128 - Whimsical Star
0256 - Nikumaru Counter
Equipment can be added by any event, and you don't technically have to even have an item associated. Of special note are the Boosters - If 0032 is set then 0001 is ignored entirely. As well, equipping the Nikumaru Counter (0256) will start the timer and unequipping it will stop and reset it. To actually save the time recorded, use <STC.
The Basics: Items and Weapons
These are grouped together for the similarity of their mechanics and that they both appear in the inventory screen. In addition, they share a common command - <GIT. For details on <GIT, please refer to the full TSC notes.
Weapons - Getting, Losing, Trading and Upgrading
To get a weapon: <AM+XXXX:YYYY - X is the weapon ID, Y is
the ammo you wish to set it to.
To lose a weapon: <AM-XXXX - X is the weapon ID
To trade one gun for another: <TAMXXXX:YYYY:ZZZZ - X is the ID of
the weapon you're giving up, Y the ID of the one you're getting and Z
is the ammo of the new gun.
To upgrade a weapon: <AM+XXXX:YYYY - X is the ID, Y is the ammo you
want to add. Yes, this is the same as getting a weapon. If you already
have the weapon, it adds to the max ammo instead.
To not let your cowboy into the bar because he's holding a 6-shooter:
#0100
<KEY<AMJ0002:0101<MSGC'mon in pardner!<NOD<CLO<END
#0101
<KEY<MSGNo guns in the bar! Git outta 'ere ya
coward!<NOD<CLO<END
(Note: Weapon ID 0002 is the Polar Star)
Items - Getting, Losing, Trading
To get an item: <IT+XXXX - X is the ID
To lose an item: <IT-XXXX - X is the ID
To trade an item: <IT-XXXX<IT+YYYY - X is the item you're trading
away and Y is the one you receive. Note there is no command to just do
the trade like with weapons - Gotta do it the hard way.
To not let a Leper into the city because he's carrying Leprosy:
#0100
<KEY<ITJ0003:0101<MSGWelcome to the city of New
Fantasticalness! <NOD<CLO<END
#0101
<KEY<MSGUNCLEAN!!!!!<NOD<CLO<END
(Note: Assumes item 0003 is Leprosy)
Using Items as Flags
In order to save flags (they can become scarce in a long or complicated mod), you can use an item as a pseudo-flag. This is especially useful with items like keys or passwords. Weapons can also be used, though I'll leave you to figure out why a bar won't let you in if you're holding a gun.
The Basics: Entities
This section details the flags that the various entities can have set. This only covers the basic, global ones - Some entities have special flags and things they do.
What is an Entity?
An entity is an object on the map that can be interacted with by the PC in one or several ways - enemies, save points and weapon energy are all entities. When editing an entity in Cave Editor, the following screen can be seen:
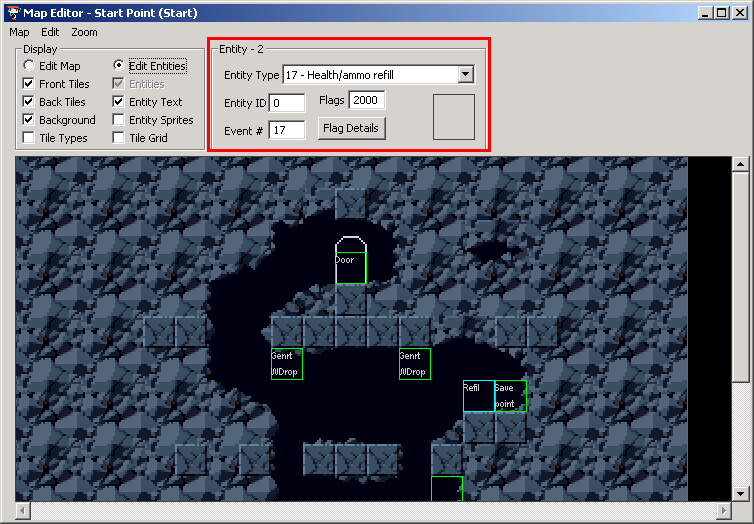
The section highlighted in red is the portion relating to entities. Of note here:
- Entity type is what the entity is. In the above image, the entity is a Health/ammo refill, entity (00)17.
- Entity ID is a special type of flag that affects special cases - An example would be the direction of the small spike. As well, flags 800 and 4000 refer to this number for their respective effects.
- Event # is exactly what it sounds like - the event associated with this entity. In the above example, the event is (#00)17, which is the entry forthe health/ammo refill event in head.tsc. When the entity is interacted with, this event is called.
- Flags are the sum of all flags set for this entity - In this case 2000. Flags can be detailed by pressing the "Flag Details" button, which brings up the dialogue shown. Following is a list of major flags you will most likely use.
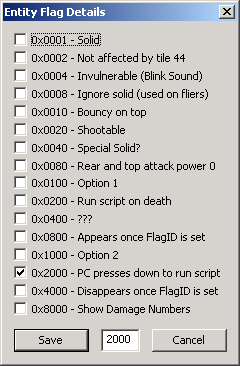
Flag 2000
This will be your go-to flag from most script/entity interaction. For starters, it will be the flag you set on all doors (usually) and any save points etc. Second, this will set the entity to be non-hostile - less used but still useful. If an enemy doesn't damage you, it probably has this flag set. The event called is the Event # associated with the entity.
Flag 200
Also called the boss flag, as that is one of its primary uses. It causes the entity to call Event # when it is killed. By setting every enemy to this and linking it to a global experience script in head.tsc, you could create an RPG-esque level-up system. Or something.
Flags 100
For the majority of entities, setting this flag will cause it to run a script on PC touch. This could be used with items to allow for automatic pick-up. Some entities, however, behave differently when this is set.
Flag 1000
This flag is for custom things and varies by-entity. Some entities will only animate if it is set, or will behave differently when this is set. Some entities have a second appearance accessible by setting flag 1000.
Flags 800 and 8000
These are two very useful things on an entity. Basically, it cause the game to check if a flag matching Entity ID is set. If it is, the entity is set (in)visible. An example of this is the Jellyfish in Grasstown - they only appear after you talk to Chaco. Setting both will result in 8000 winning out - 800 will be ignored.
Other Flags
The ones I've elaborated on are just the most useful. The other flags can be fun to play with, so feel free to experiment with different combinations.
The Basics: Lyger's Part
The following series of images was created by friend and fellow forum-goer Lyger. As he has disappeared from reality at the moment, I am not sure if permission is given to use them, but I am hoping that it has been. I have included them here for two reasons: The first is that they provide a handy reference for map design and text-box information, and to back them up for future note (as Lyger's Photobucket is suspended as of writing). As well, seeing as the information was already well written and demonstrated, I figure I'd avoid creating duplicate works.

As these may prove useful to many people:
[Download all 3 images in a RAR]
The Basics: Getting Around
This section outlines how to get around, and look good while doing it.
Inter-Map Travel
There is only one command to do this, <TRA. And it's a clunker - requiring 4 arguments. This is a case best suited for example. So:
Example 1:
Script on map 0000:
#0100
<TRA0001:0100:0001:0001<END
Script on map 0001:
#0100
<KEY<MSGThis is the event that runs when you
arrive.<NOD<CLO<END
This is the most basic example possible. It literally takes you from map 0000 and drops you into map 0001. No fades, no fancy sounds, nothing. So how can we spice this up? Well, we could add a couple fades, and consult the handy-dandy Table of Directions! to help us.
Example 2:
Script on map 0000:
#0100
<KEY<FAO0004<TRA0001:0100:0001:0001<END
Script on map 0001:
#0100
<KEY<FAI0004<MSGThis is the event that runs when you
arrive.<NOD<CLO<END
If you haven't guessed, this example has fades. More exactly, fade 0004 (both in and out). In the case of fading, you can use direction 0004 to fade in/out to/from the center. But what if that was a door we walked through? Wouldn't it make a noise? I assume you know how the <SOU command works, so we can skip this example. So instead, lets run a complicated script.
Example 3:
Script on map 0000:
#0100
<KEY<SOU0011<CNP0100:0000:0000<WAI0010<HMC<WAI0010<FAO0004<TRA0001:0100:0001:0001<END
Script on map 0001:
#0100
<KEY<SOU0070<WAI0010<SOU0070<WAI0010<ZAM<SMC<FAI0004<MSGThis
is the event that runs when you arrive.<NOD<CLO<END
Let's parse this, shall we? First, you'll notice that I've added a few commands not mentioned in this document. These (<ZAM, <CNP) are detailed in the TSC Notes, so we can suffice to say they do cool things for now. However, there are a couple of commands I will go over: <HMC and <SMC.
<HMC hides your character, and can be used to simulate going through a door or vanishing. <SMC does the opposite - It shows the PC. Ignoring the fancy add-ons, this is essentially the same script as example 1. That's the beauty of <TRA - It's really all you need. Everything else is icing on the cake.
Look, Over There! *Kicks*
Want the PC to look to the left and then to the right for an epic dance? It's as easy as adding <MYD0000 and <MYD0002 somewhere in your script. Keep in mind that a <PRI will delay it working until <END, so try to use this with <KEY if possible. To spice up that dance, you can add a <MYB0000, <MYB0002 and <MYB0001 which will knock you to the right, to the left, and straight up respectively. The directions for <MYB are a *little* goofed - Just remember that 0000 bumps you FROM the LEFT and 0002 bumps you FROM the RIGHT. Again, Table of Directions! can help.
Table of Directions!
This table lists the direction codes used by several TSC commands
|
Code
|
Direction
|
|
0000
|
Left |
|
0001
|
Up**
|
|
0002
|
Right
|
|
0003
|
Down**
|
|
0004
|
Center*
|
* Only works with <FAI/<FAO
** Generally only useful for <FAI/<FAO and <CNP/<ANP
Intra-Map Travel
There's two ways you can move the PC around the map locally - The lame, long, boring way of using <TRA and pointing to the same map, or the <MOV command. There are few commands simpler than <MOV - Just plug in your X and Y destination and off you go. Just remember to include all 4 digits or you can end up a thousand blocks off course.
The Basics: Common Entities
This is a list of entities commonly used for various things - Things such as doors and save points:
|
Entity
|
Description
|
Code
|
Notes
|
| Door | A standard doorway. | 0018 | These entities aren't associated with any particular event; you can use them for anything. |
| Save Disk | That spinning floppy disk. | 0016 | |
| Health Refill | Health refill station. | 0017 | |
| Hidden Heart/Missile | Shootable hidden stuff. | 0125 | Setting flag 1000 sets it to be a hidden missile. Otherwise it's a heart. |
| Teleporter | A teleporter. Has a special animation sequence. | 0022 | <ANPXXXX:0001:0000 to use. X is the entity event #. |
| Teleporter Lights | Handy to indicate if a teleporter works or not. | 0023 | Place this in the space directly above the teleporter for correct alignment. |
| Pot | Background entity. | 0078 | Can be used for anything; here for reference. Setting flag 1000 changes the pot to a second sprite (a slightly wider pot). |
| Fireplace Fire | Background entity. | 0038 | Can be used for anything; here for reference. |
| H/V Trigger | Most used entity ever. Use to trigger events in mid-map. | 0046 | Setting flag 1000 sets it to trigger when crossed horizontally. Setting flag 100 makes it follow the player along its triggering line. |
| Smoke | A puff of smoke. | 0004 | Here for reference. You'll often <CNP things to this. |
| Small Spikes | Small 5-damage spikes. | 0211 | Event # will change the direction. 0000 is left, 0001 points up, 0002 points right and 0003 points down. |
| Large Spikes | Lethal damage spikes. | 0027 | Oooooh... Pointy *BOOM!* |
| Sign | A sign post. | 0037 | Not associated with any script; can be used for anything. |
| Bed | Nap time. | 0034 | |
| Chest (Closed) | I wonder what's inside... | 0015 | See example below for details. |
| Chest (Open) | Treasure chest with its contents removed. | 0021 | Setting flag 1000 causes this to display 1 tile down from its actual position. |
| Life Capsule | The sprite for a life capsule. | 0032 | Not associated with any script; can be used for anything. |
| Energy Capsule | Shootable weapon energy container. | 0253 | Setting the entity ID changes the amount of weapon energy contained inside. |
| Missile | A single missile refill. | 0086 | Setting flag 100 makes it run Event # when the PC picks it up. Flag 1000 makes it not flash and disappear. |
| Heart | A single life-restoring heart. | oo87 | |
| Sparkling Item | A mysterious sparkle that begs the player to get it. | 0070 | Not associated with any script; can be used for anything. |
The entities listed here are those that are common in 2 regards: First that they are commonly used, and second that they can be used on ANY map. The majority of entities (enemies, in particular) are associated to a specific sprite set. As a map can only have 2 sprite sets attached to it, it's good to know a few global ones.
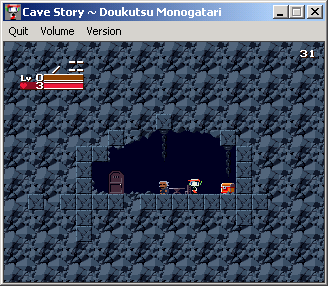
The Basics: Bringing It All Together
The following is an example of a starting map. Of note: Event #0200 is the default event that is run when the game is started. In original Cave Story, this event is the "From somewhere, a transmission..." scene. Illustrated in this are several commands not discussed in this document - Refer to the TSC Notes for further detail. With the recent influx of new modders making new mods, I figure I'd give them a break and host these few basic TSC scripts for functions common to most mods. They are very, very basic, only expanding a little into flags, but, with a few changes to the numbers provided in the examples, you can use these for many, many things. I may expand to include a teleports script and a few others, such as a pitfall trap or a basic boss fight. I don't intend to make this a script-mart for easy scripts, I intend this to be a dissection of the basic functions, as well as a learning tool. The scripts, while *theoretically* just usable as a copy-and-paste idea, will probably have to have a few values changed (and thus learn what the values do). I encourage those reading this to a.) view my organized and fully-explained TSC notes found here and b.) experiment with everything.
 |
Jump To Example:
|
| #1: Starting Map | |
| #2: Basic Door (Inter-map) | |
| #3: Basic Door (Intra-map) | |
| #4: Locking Inter-map Door (Item) | |
| #5: Locking Intra-map Door (Item) | |
| #6: Lock-if-has (Inter) | |
| #7: Chest (Intra) | |
| #8: Teleporter (Basic) | |
| #9: To Be Announced | |
| #10: To Be Announced | |
| #11: To Be Announced | |
| #12: To Be Announced |
Example #1: Starting Map
The Script:
#0090
<MNA<CMU0008<FAI0000<END
#0091
<MNA<CMU0008<FAI0001<END
#0092
<MNA<CMU0008<FAI0002<END
#0093
<MNA<CMU0008<FAI0003<END
#0094
<MNA<CMU0008<FAI0004<END // Events 0090 - 0094 are the
events called when you travel TO this map.
#0100
<KEY<ITJ0009:0101<MSGIt's locked...<NOD<CLO<END
#0101
<KEY<FAO0003<TRA0001:0093:0010:0010<END // The only exit, a
locked door needing item 0009 (Rusty Key) to open.
#0102
<KEY<FLJ0100:0001<CNP0102:0021:0000<SOU0022<MSGOpened
the chest...<NOD<CLR<IT+0009<GIT1009<CMU0010Got a =Rusty
Key=!<FL+0100<WAI0160<NOD<CLO<GIT0000<RMU<END //
Gets the Rusty Key, changes the chest to a closed sprite and sets flag
0100. If flag 0100 is set, it jumps to the global "Empty..." message
instead. Once flag 0100 is set, subsequent visits to the map will show
an open chest - The closed chest is hidden and the open one (one tile
above) is displayed instead.
#0200
<PRI<MS2Welcome to the fantastic world of
New Fantasyville! Please enjoy your
stay!<NOD<CLO<MNA<FAI0004<CMU0008<END // This is the
event that runs when the game is started for the first time.
Entities used:
The door is event #0100 with flag 2000 set, the chest is event #0102 with flag 2000 and 4000 set with an entity ID of 100. A treasure chest (open) entity one tile above the closed chest has flags 2000, 1000 and 800 set and is event #0001 (global "Empty..." message) with an entity ID of 100.
Explanation:
The above is explained in its comments. This is for two reasons: a.) The script is of enough length to warrant comments and b.) It demonstrates correct comment placement. The following examples are explained in the explanation section.
Example #2: Basic Door (Inter-map)
The Script (Map 0000):
#0100
<KEY<CNP0100:0000:0000<SOU0011<HMC<FAO0004<TRA0001
:0100:0006:0009
The Script (Map 0001):
#0100
<CMU0024<SMC<FAI0004<MNA<END
Entities used:
#0100: Door sprite with flag 2000 set (run on interact)
Explanation:
The above is a basic room-to-room door script.
Upon interacting with entity 101 (a door), the game locks out player
control (<KEY), changes the door to a <nothing> (<CNP),
makes a door opening sound (<SOU), hides your character (<HMC),
fades out into the center (FAO), and travels to map 2, coordinates X: 6
Y: 9, then runs script 0100 on that map (TRA).
Upon arriving at the destination map, the game changes the music
(<CMU), unhides your character (<SMC), fades in from the center
(<FAI), displays the name of the area (<MNA) and finally frees
the earlier player control lock (<END).
Example #3: Basic Door (Intra-map)
The Script:
#0100
<KEY<CNP0100:0000:0000<SOU0011<HMC<WAI0010<CNP0100
:0018:0000<MOV0006:0009<WAI0020<CNP0101:0000:0000<
SOU0011<SMC<CNP0101:0018:0000<END
#0101
<KEY<CNP0101:0000:0000<SOU0011<HMC<WAI0010<CNP0101
:0018:0000<MOV0009:0006<WAI0020<CNP0100:0000:0000<
SOU0011<SMC<CNP0100:0018:0000<END
Entities used:
#0100: Door sprite with flag 2000 set (run on interact)
#0101: Door sprite with flag 2000 set (run on interact)
Explanation:
The above is a simple script to move a character via a door within a
single room, and back (example being the Hideout in the Plantation).
The doors are: #0100 @ (9,6) and #0101 @ (6,9). The similarities
between the inter-map and intra-map script warrant no real explanation,
apart from pointing out the major difference: intra-map uses the
<MOV command instead of <TRA, and no additional script is called
beyond the event that is triggered.
Example #4: Locking Inter-map Door (Item)
The Script:
#0100
<KEY<ITJ0001:0101<MSG
It's locked...
Try getting a key!<NOD<CLO<END
#0101
<CNP0100:0000:0000<SOU0011<HMC<FAO0004<TRA0001:010
0:0006:0009
Entities used:
#0100: Door sprite with flag 2000 set (run on interact)
Explanation:
In this case, when you interact with the door, it called a check to see
if you have item 0001 (Arthur's Key). If you have it, it continues
(jumps) to event 0101 and runs the standard intra-map door script. If
you lack the item, it give a message: "It's locked. Try getting a key!"
As well, the above can be done using a flag by replacing the <ITJ
with a <FLJ. In doing so, to unlock the door you need to set the
flag.
Example #5: Locking Intra-map Door (Item)
The Script:
#0100
<KEY<ITJ0001:0101<MSG
It's locked...
Try getting a key!<NOD<CLO<END
#0101
<KEY<CNP0100:0000:0000<SOU0011<HMC<WAI0010<CNP0100
:0018:0000<MOV0006:0009<WAI0020<CNP0101:0000:0000<
SOU0011<SMC<CNP0101:0018:0000<END
#0102
<KEY<CNP0101:0000:0000<SOU0011<HMC<WAI0010<CNP0101
:0018:0000<MOV0009:0006<WAI0020<CNP0100:0000:0000<
SOU0011<SMC<CNP0100:0018:0000<END
Entities used:
#0100: Door sprite with flag 2000 set (run on interact)
#0102: Door sprite with flag 2000 set (run on interact)
Explanation:
This case provides (depending on context) a one-way door (if the first
door you encounter is #0102) or a locked door requiring an item to
open. Again, the doors are: #0100 @ (9,6) and #0102 @ (6,9).
Example #6: Lock-if-has (Inter)
The Script:
#0100
<KEY<ITJ0001:0101<CNP0100:0000:0000<SOU0011<HMC<FA
O0004<TRA0001:0100:0006:0009
#0101
<FLJ0100:0102<MSG
Oops, you bwoke it!<FL+0100<NOD<CLO<END
#0102
<KEY<MSG
Still bwoken... <NOD<CLO<END
Entities used:
#0100: Door sprite with flag 2000 set (run on interact)
Explanation:
The above is an interesting variation; the door is unlocked if you
DON'T have the item, and locked (broken) if you do. Additionally, by
the addition of a <FLJ to #0101 and a <FL+ that sets the
appropriate flag, you create a second message that says "Still
bwoken..." upon re-examining the door. Upon the removal of the item
from the inventory, the door will once again function; you need not
clear the flag because it is inside an event that is not triggered if
the door is unlocked.
Example #7: Chest (Basic)
The Script:
#0100
<KEY<FLJ0100:0101<MSG
Opened the chest...<NOD<CLR<CNP0100:0021:0000<SOU0022
<CMU0010<GIT1001<IT+0001You got =Arthur's
Key=!<WAI0160<NOD<GIT0001<CLO<FL+0100<END
#0101
<KEY<MSG
Empty...<NOD<CLO<END
Entities used:
#0100: Chest (closed) sprite with flags 2000 (run on interact) and 4000
(invisible if flag ID is set), and it's flag ID set to 100
#0101: Chest (open) sprite with 2000 (run on interact), 1000 (appears 1
tile lower) and 800 (visible if flag ID is set), and it's flag ID set
to 100, positioned one tile above #0100
Explanation:
This is a basic script for a chest. Upon opening the chest (#0100), the
closed chest is changed to an open one, and the player receives an item
and a little message with the "Got item" jingle, as well as the little
graphic of the item. After that, flag #0100 is set. Upon re-examining
the now open chest, the player receives the "Empty..." message (it can
be called as event #0001 from any map, but is provided here as #0101
for clarity). Upon leaving and re-entering the stage, because flag
#0100 is set, entity #0100 doesn't appear and entity #0101 does.
Upon interacting with the chest again, the player still receives the
"Empty..." message.
Example #8: Teleporter (Intra)
The Script (Intra):
#0101
<KEY
<SNP0111:0021:0006:0000
<HMC
<WAI0060
<ANP0108:0001:0000
<WAI0100
<ANP0108:0000:0000
<MOV0005:0011
<ANP0103:0001:0000
<CNP0105:0112:0000
<WAI0100
<ANP0103:0000:0000
<MYD0000
<SMC
<CNP0105:0000:0000
<MNP0105:0004:0010:0000
<END
#0103
<KEY
<SNP0111:0005:0012:0000
<HMC
<WAI0060
<ANP0103:0001:0000
<WAI0100
<ANP0103:0000:0000
<MOV0021:0005
<ANP0108:0001:0000
<CNP0106:0112:0000
<WAI0100
<ANP0108:0000:0000
<MYD0000
<SMC
<CNP0106:0000:0000
<MNP0106:0020:0004:0000
<END
Entities Used:
For all intents and purposes, just two teleporter entities (flag 2000
set on both), one at 0021 x 0005 (#0101) and one at 0005 x 0011 (#0103)
and two nothing entities (#0105 and #0106). Of important note is the
<ANP uses a Y value of 0001 to make the teleporter flash and 0000 to
make it stop. The entity created with <SNP is the "Quote teleports
out" entity.
Explaination:
Before I break this down, there are two important notes.
The first is that the animations for the teleporter entity are tied
to the teleporter entity. Additionally, the wait times
(<WAI) are the minimum for the animations to complete. As this is a
complicated script, I'll only explain the main functions and let you
figure out the rest. To begin, the game locks out player input, then
hides the PC. Immediatly after hiding the PC, it spawns an entity
version of the PC, which hops up onto the teleporter and fades out. It
then moves the PC to the destination, which another PC entity fades in,
before unlocking the player with the finishing of the script. The same
process occurs when using event #0103, except you return to the first
teleport.
The Basics: Graphic Editing Tips
This is a reference for important points in graphic editing. Of importance is that images are not limited to any specific colors in an external editor (Cave Editor limits you to a few) - You can convert all PBM/BMP files to 24 bit if you want - Though this will increase the file size significantly.
Sprite and Tile Dimensions
Firstly, the difference between a sprite and a tile: A tile is a section of the map, a sprite is the graphic for an entity. Tiles are ALWAYS 16 by 16 pixels and are stored in CS Directory/data/stage as Prt[TilesetName].pbm (or .bmp). To figure out how many tiles can fit on a map, divide the width and height by 16. If you get a fractional number, adjust the dimensions to be evenly divisible by 16. Sprites vary. A lot. As a general rule they are at least 16 by 16, but there are some extremely massive sprites (Balfrog, The Core). As an additional guide, the dimensions will usually be divisible by 8, so a 24 x 24 sprite is possible. The two global spritesheets are found in CS Directory/data, with the other entity sheets stored in /Npc.
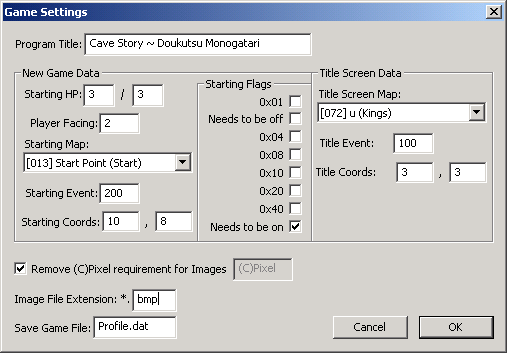
The "(C)Pixel" Requirement
As a means of preventing random goofing around with the game files, Pixel included a check in the game to verify if the images have been tampered with. This is accomplished by a hex string appended to the end of image files. Because of the way bitmaps save, if the image is edited the appended hex string is lost, and therefore will error out when the game tries to load it. I won't discuss how to use a hex editor to re-append the "(C)Pixel" string to the end of an image; I'll leave that to you to try. Built into Cave Editor is a way around this, though. In fact, 2 ways. The first is the manual way: You can edit images in CE's built-in editor. It will automatically append the required string. However, if you want to use an external editor, I suggest checking the "Remove (C)Pixel requirement for Images" box, like so:

Using BMP Images
If you wish to use *.bmp as your image extension, just change the file extension in CE. It will automatically change all the *.PBMs into *.BMPs. On a side note, *.pbm and *.bmp are the same format - Bitmap Image - Pixel probably chose to use *.pbm for the same reason as using the (C)Pixel string.
Advanced Stuff
I cannot
stress this enough: BACKUP YOUR MOD. The things
covered in this section can quite possibly break your mod EXE, so
proceed with caution. Additionally, in the event you intend to use a
hacked EXE (such as one with a custom entity or weapon), resources
(e.g. music) should be replaced AFTER
the relevant edits. You have been warned.
On The Subject of Music
The music of Cave Story is stored inside the EXE in a Pixel-created format called an Organya, or ORG for short. This music format has several advantages over the game-industry standard of WAV or MP3 that I won't cover.This stems from what an ORG is - Just a list (or table) of notes. The actual sound component is stored within the player itself, reducing the filesize of an ORG (as little as 4Kb) to far below a comparable WAV/MP3 (1 Mb+). The only major drawback is that you are presented with limited instrument choices - And even fewer when using them with Cave Story - As the actual notes are stored within the EXE and are hard to change. The limitation for ORGs in Cave Story is that your percussion set is limited to only a handful of the 2-dozen ones available in the latest Org Maker. The percussion tracks you can use are: Bass01, Snare01, HiOpen, HiClose, Tom01 and Per01. You can uses these tracks in any of the percussion slots, though, and you can have multiple of the same instrument. As for actually making the music, I am not much help there (I'm tonedeaf). But what I can say is that, even if you know nothing about music, you can still make an attempt. Lay down a few notes and give it a listen. If you don't like it, delete it or tweak it. When it sounds right move onto the next notes. As well, there are far better tutorials on how to use Org Maker, so I won't outline it here. What I aim to provide you with is the technical side of things.
Importing Resources
To actually use the music in a CS mod, you need to import it. This is where a couple of important points come in. Firstly, at this point, Sue's Workshop cannot deal with imported ORGs. It is by this token alone that I strongly urge you to use Cave Editor if you're not already. Second, on a less horrendous note, the music resource names don't exactly match up with the song titles. For your convenience, I include this table.
|
TSC Code
|
<Un>Official Title
|
Resource Name
|
|
0000
|
<None>
|
XXXX
|
|
0001
|
Mischevious Robot
|
WANPAKU
|
|
0002
|
Safety
|
ANZEN
|
|
0003
|
<Game Over>
|
GAMEOVER
|
|
0004
|
Gravity
|
GRAVITY
|
|
0005
|
On To Grasstown
|
WEED
|
|
0006
|
Meltdown 2
|
MDOWN2
|
|
0007
|
Eyes of Flame
|
FIREEYE
|
|
0008
|
Gestation
|
VIVI
|
|
0009
|
Mimiga Town
|
MURA
|
|
0010
|
<Get Item>
|
FANFALE1
|
|
0011
|
Balrog's Theme
|
GINSUKE
|
|
0012
|
Cemetary
|
CEMETARY
|
|
0013
|
Plant
|
PLANT
|
|
0014
|
Pulse
|
KODOU
|
|
0015
|
<Boss Defeated>
|
FANFALE3
|
|
0016
|
<Get Life Capsule>
|
FANFALE2
|
|
0017
|
Tyrant
|
DR
|
|
0018
|
Run!
|
ESCAPE
|
|
0019
|
Jenka 1
|
JENKA
|
|
0020
|
Labyrinth Fight
|
MAZE
|
|
0021
|
Access
|
ACCESS
|
|
0022
|
Opression
|
IRONH
|
|
0023
|
Geothermal
|
GRAND
|
|
0024
|
Cave Story
|
CURLY
|
|
0025
|
Moonsong
|
OSIDE
|
|
0026
|
Hero's End
|
REQUIUM
|
|
0027
|
Scorching Back
|
WANPAK2
|
|
0028
|
Quiet
|
QUIET
|
|
0029
|
Final Cave
|
LASTCAVE
|
|
0030
|
Balcony
|
BALCONY
|
|
0031
|
Charge
|
LSTBTL
|
|
0032
|
Last Battle
|
LSTBT3
|
|
0033
|
The Way Back Home
|
ENDING
|
|
0034
|
Zombie
|
ZONBIE
|
|
0035
|
Break Down
|
BDOWN
|
|
0036
|
Running Hell
|
HELL
|
|
0037
|
Jenka 2
|
JENKA2
|
|
0038
|
Living Waterway
|
MARINE
|
|
0039
|
Seal Chamber
|
BALLOS
|
|
0040
|
Toroko's Theme
|
TOROKO
|
|
0041
|
<King's Theme>
|
WHITE
|
This is all fine and handy and all, but it doesn't tell you how to actually replace the resources. To that, you'll need Resource Hacker or a similar program. Once you have that, replacing music (or any resource, really) is as simple as the following steps.
|
Instructions
|
Screenshot
|
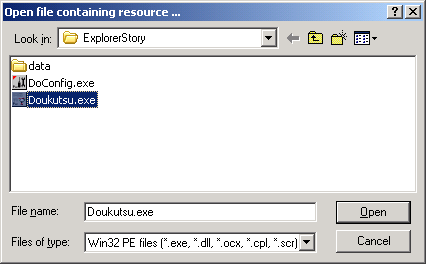
|
Step 1: Open the CS executable you wish
to swap the music in.
|
 |
|
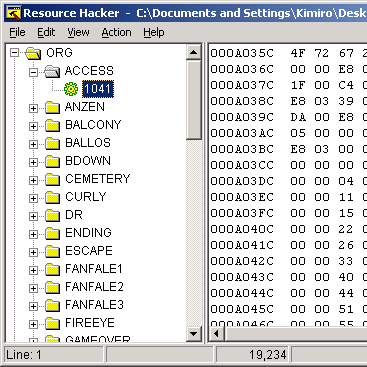
Step
2: Open the "ORG" resource catagory and find the song you wish to
replace (according to the table above. ACCESS is my example. Take note
of the name.
|
 |
|
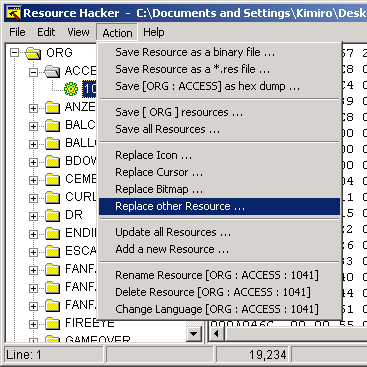
Step 3: Under the action menu select
"Replace Other Resource..."
|
 |
|
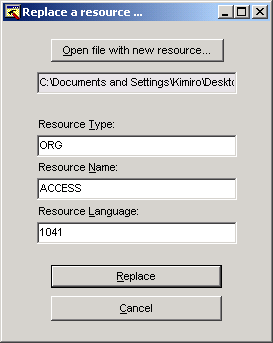
Step
4: A dialogue will pop up. To begin, press "Open file with new
resource" and find the song you wish to import. The dialogue will
change to the one on the right; enter the information exactly as you
see it, replacing Resource name with the name of the track you're
replacing (Eg. Access). Press the replace button, then goto file >
save to save the EXE.
|
 |
Other Resources In The EXE
The EXE doesn't just contain music, but is the most commonly replaced asset. One of the other things you might wish to replace are the ending credit images, or potentially the instrument WAV files. In these endeavours, a similar method to replacing the music can be used, so I won't elaborate on this point.
Final Thoughts
This guide is not a replacement for learning. To succeed, you will have to study the references provided, but more over experiment. What I hope I have left you with are the tools to figure out the rest. Following are a couple miscellaneous tips for improving your mod.
FPS CounterTo disable the the built-in FPS counter, delete the file "fps" from the same directory as your game EXE. I included it by default to serve as a debug tool.